Hello everyone,
I am hoping that someone may have some thoughts on how to document what appears to be an etched print on the side of a handgun magazine. The print was not there prior to the use of CA. I was able to see it after CA'ing it, but it will neither lift nor dye stain. I have tried both MBD and Ardrox and examined it under our polylight with negative results (both before and after rinsing). I can see the print when I tilt it a certain way under overhead room lights.
I have been able to photograph it using bounce lighting, but I feel like I should be able to get better results. I have tried other lighting techniques too (using a dome, placing a light directly above and pointing it straight down at the print and then using an additional oblique light, snake lights, flood lights, etc.).
Does anyone have any other thoughts on a lighting or photography technique? I would certainly appreciate any guidance!
Thanks! Heather
Need help with an etched print on a gun magazine
-
Heather Baxter
- Posts: 39
- Joined: Tue Mar 14, 2006 12:49 pm
- Location: Mesa, AZ
-
Thomas Taylor
- Posts: 98
- Joined: Mon Jan 15, 2007 7:38 am
- Location: USA
Hi Heather
I still use an old MP-4. It is set up just to the side of the overhead fluorescent light fixture. I do a lot of direct-reflected lighting using the ceiling light. Of course, the surface (magazine, in this case) has to be tilted to the side to catch the ceiling light. On a surface such as you describe, you should be able to get a photo equal to or better than the clarity of the print as you see it with the naked eye.
I'm sure some of the new digital folks will have a better idea, but we haven't gone that way yet and I wouldn't have a clue about it.
I still use an old MP-4. It is set up just to the side of the overhead fluorescent light fixture. I do a lot of direct-reflected lighting using the ceiling light. Of course, the surface (magazine, in this case) has to be tilted to the side to catch the ceiling light. On a surface such as you describe, you should be able to get a photo equal to or better than the clarity of the print as you see it with the naked eye.
I'm sure some of the new digital folks will have a better idea, but we haven't gone that way yet and I wouldn't have a clue about it.
Thomas Taylor,
The old man on the block.
The old man on the block.
-
Steve Everist
- Site Admin
- Posts: 551
- Joined: Sun Jul 03, 2005 4:27 pm
- Location: Bellevue, WA
Heather,
Although using an optical mirror is better, you can use this technique with a clean sheet of glass too.
Get your camera focused on the latent, and then take a sheet of glass and hold it at a 45 degree angle between the lens and the magazine. Then take your light source and aim it at the glass.
Some of the light will be reflected onto the object and some will just pass through the glass. Then center your light over the latent print by maneuvering the light in combination with the glass angle. Once you've got it set, you'll want to have something holding both the light and the glass to capture the latent.
What happens is that the light that would be reflected right back into your lens from the magazine will also bounce off the glass towards the light source. Some will also pass through to the lens, but it won't create the glare you'd have otherwise. I have some images at work that I can use to illustrate this, but not at home. I'll search around and see if I can find one to link though.
Although using an optical mirror is better, you can use this technique with a clean sheet of glass too.
Get your camera focused on the latent, and then take a sheet of glass and hold it at a 45 degree angle between the lens and the magazine. Then take your light source and aim it at the glass.
Some of the light will be reflected onto the object and some will just pass through the glass. Then center your light over the latent print by maneuvering the light in combination with the glass angle. Once you've got it set, you'll want to have something holding both the light and the glass to capture the latent.
What happens is that the light that would be reflected right back into your lens from the magazine will also bounce off the glass towards the light source. Some will also pass through to the lens, but it won't create the glare you'd have otherwise. I have some images at work that I can use to illustrate this, but not at home. I'll search around and see if I can find one to link though.
Steve E.
-
Steve Everist
- Site Admin
- Posts: 551
- Joined: Sun Jul 03, 2005 4:27 pm
- Location: Bellevue, WA
Here's an image similar to what I was describing. It looks like they used a black block to cover the light that would be skimming across the surface too. Since we usually use our ALS, the light is much more focused and I don't usually have that issue.
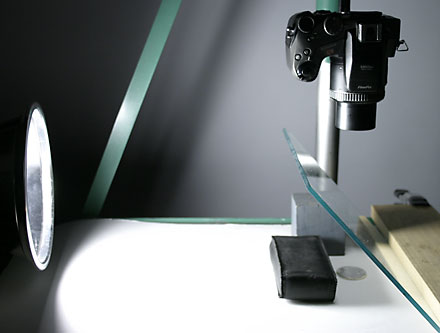
The site that this image comes from actually has some good information about shooting shiny/reflective objects - in this case coins:
http://www.sigma-2.com/camerajim/cjgcoins.htm
The site that this image comes from actually has some good information about shooting shiny/reflective objects - in this case coins:
http://www.sigma-2.com/camerajim/cjgcoins.htm
Steve E.
-
Shane Turnidge
- Posts: 81
- Joined: Thu Jul 21, 2005 11:55 am
- Location: Canada
 Hi Heather,
I'm guessing the magazine you have is painted or powder coated. Is there a chance that the impression you're seeing is actually imbedded within the paint itself? (Plastic Impression)
I had a case a few years back that involved a plastic impression on photographic paper made when the perpetrator carefully ripped a photograph in two. He left an impression in the photographic paper that I could only see via oblique lighting. I too could not enhance the impression with dyes and like you, I photographed the impression as best as I could.
After checking with some collegues and the company that made the photographic paper, (To see if it was possible) the photographic paper was processed with a downsized ESDA device that we had in the office. By doing so a decent impression was developed using black magnetic powder.
I don't know if you have access to such a device but it may be something to consider.
Shane
You're only as good as your last Ident.
-
antonroland
- Posts: 253
- Joined: Fri Feb 01, 2008 5:20 am
- Location: Port Elizabeth, South Africa
-
Heather Baxter
- Posts: 39
- Joined: Tue Mar 14, 2006 12:49 pm
- Location: Mesa, AZ
Thanks so much for everyone's help! I used the axial lighting technique proposed by Steve, and it worked well.
Thomas, I use an MP4 stand too, but not the camera that goes with it (the polaroid film we have is so ancient, we use our digital cameras).
Shane, I don't think that I ever would have considered an ESDA. Unfortunately, we don't have one here. I suppose the print could be plastic. When I examined it under the axial light, you could clearly see the layer of CA on it. Very little of the glue was adhering to any of the ridge detail. The print is definitely either "etched" or imbedded in the coating.
Antonroland, I can't post any photos here, since this is an active case (homicide investigation). I'm sorry.
Thanks again, and if anyone comes up with any other ideas, they are always appreciated.
Heather
Thomas, I use an MP4 stand too, but not the camera that goes with it (the polaroid film we have is so ancient, we use our digital cameras).
Shane, I don't think that I ever would have considered an ESDA. Unfortunately, we don't have one here. I suppose the print could be plastic. When I examined it under the axial light, you could clearly see the layer of CA on it. Very little of the glue was adhering to any of the ridge detail. The print is definitely either "etched" or imbedded in the coating.
Antonroland, I can't post any photos here, since this is an active case (homicide investigation). I'm sorry.
Thanks again, and if anyone comes up with any other ideas, they are always appreciated.
Heather